VMS GET STARTED GUIDE
This guide will help an Education Institution (Schools/Classes/College/Classes or Individual Teacher) to get started with VMS Platform Setup. To make best use of the platform and technology PLEASE READ FOLLOWING GUIDE CAREFULLY.
Before You continue, make sure you have the valid credentials (username/password) for using VMS Systems. If you do not have it, get in touch with the VMS Support team or the sales representative to get your copy of welcome kit
Quick Download Links
Supervisor App:
https://play.google.com/store/apps/details?id=com.moryaas.vmssupervisor
Teacher App:
https://play.google.com/store/apps/details?id=com.moryaas.teachersapp
Parent App:
https://play.google.com/store/apps/details?id=com.moryaas.vmspreschool
- SYSTEM OVERVIEW
This section will answer your question like what is VMSZone how it works, which are different components of the system etc.
- PARENT MOBILE APP AND PORTAL
This are steps to help parents install the app. This also includes some slip format that can be used to collate data from parents.
- TEACHER MOBILE APP AND PORTAL
This are steps to help teachers to quickly install the app.
- SUPERVISOR / PRINCIPAL / ADMIN APP AND ADMIN PORTAL
This are steps to install/login to supervisor portal.
- RFID GUIDE
This section contains details of RFID Reader and how to configure and connect to your wifi.
- FIRST USE
This section covers list of items that you should check before you start.
- DO’s and DONT’s
This section covers some DO’s and DONT’s Tips and guide for using VMS System
SYSTEM OVERVIEW
Following is hierarchy of VMS Logins/Roles. Each User is mapped with his/her Mobile Number, which is their primary ID. Each user can have multiple roles. Example: A Teacher can also be a parent, supervisor or a limited supervisor.
Institution Owner
This is the topmost role of the institution; user having access to this role can manage various supervisor roles for all the branches.
Example: Login into a branch and view its reports, Add/Remove Children, Teachers etc.VMS Supervisor
This is the topmost role of the branch; user having access to supervisor account would be able to manage various admin functions.
Example: Child Enquiry, Child Admission, New Teacher Entry, New Supervisor Account, New Staff, Fees Management, Exam Management etc.Teacher Role
This role is for the Teachers/Coordinators of the institution. It allows the user to send Alerts, Pictures, Homework, Syllabus, Mark Attendance, PTA Meeting Details, Holiday, Event details with parents/students.
Parent/Student Role
This role is for the Parents/Students of the institution. It allows the user to view messages that are sent by the Teacher or Supervisor of the Institution.
Limited Supervisor
This role is made available to various admin users of the institution ex: Enquiry Coordinators, Fee / Accounts Team, Library, Asset Managers etc.
SUPERVISOR APP
Supervisor App is meant for Principals, Owners, Managers, Limited Supervisors and Admin Staff of the institution.
Steps To Install on Android Mobile
Search VMS Supervisor on Google Play Store or Scan this QR Code
You would see Blue Colored VMSSupervisor App With “A” Symbol
Install the App, Ensure you give All Permission during Installation without which it would not register
properly.
After installation it would ask your Mobile Number enter your number and click submit.

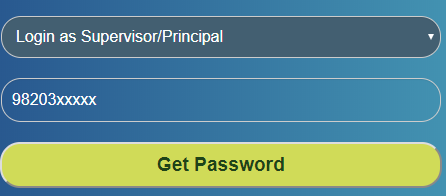
Steps to Login on a Computer
Open Chrome Browser and Visit Website https://vmsacademy.com When Using First Time Click First Time Users
- Select Login as Supervisor
- Enter Your Registered Mobile Number
- Click Get Password
- You will Receive your PASSWORD in 30 Secs

Visit Login Page
- Enter Your Number
- Enter Password
- Click Login
PARENT MOBILE APP AND PORTAL
To Install Parent Mobile App / Portal follow these steps.
Steps To Install Mobile App
Search VMS Parent on Google Play Store or Iphone Apple Store.
You would see Red Colored VMS Parent App. Install the App, Ensure you give All Permission during Installation without
which it would not register properly.
After installation it would ask your Mobile Number enter your number and click submit.
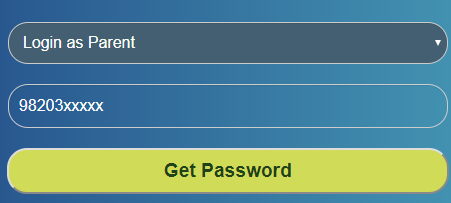
Steps to Login on a Computer
Open Chrome Browser and Visit Website https://vmsacademy.com
When Using First Time Click First Time Users
- Select Login as Supervisor
- Enter Your Registered Mobile Number
- Click Get Password
You will Receive your PASSWORD in 60 Secs
Visit Login Page
- Enter Your Number
- Enter Password
- Click Login
TEACHER MOBILE APP AND PORTAL
Teacher Mobile App / Portal is meant for Teachers, Coordinators who would be involved in sending Alerts, Homework, Syllabus, Attendance etc on regular basis. To Install the App or Login on from the computer follow this steps.
Steps To Install on Android Mobile
Search VMS Teacher App on Google Play Store or Scan this QR Code
You would see Blue Colored VMS Teacher App
Install the App, Ensure you give All Permission during Installation without which it would not register properly.
After installation it would ask your Mobile Number enter your number and click submit.
Steps to Login on a Computer
Open Chrome Browser and Visit Website https://vmsacademy.com
When Using First Time Click First Time Users
- Select Login as Teacher/Coordinator
- Enter Your Registered Mobile Number
- Click Get Password

RFID GUIDE
This section contains details of RFID Reader and how to configure and connect to your wifi.
VMS RFID is the device for taking Student, Staff, Teacher Attendance.
The System works in online and offline mode. RFID can be used with Camera or Without Camera. Follow below steps to
update your WiFi Password.
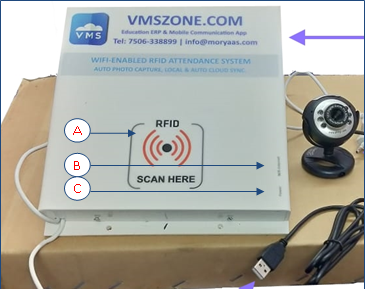
A – RFID Scan Status
B – Internet Connection Status
(Stable – Internet connected)
(Continuous Blinking –Not Connected)
C - Power Status
Steps to Update Settings or Change Wifi Password
- Step 1) Login to your VMS Supervisor Account (on https://vmsacademy.com)
- Step 2) Open Manage RFID Devices (In Others Section)
- Step 3) Edit the device that you wish to change settings / Wifi Account Details.
- Step 4) Change the Wifi Username and Password (Note it is Case Sensitive so please ensure you have changed it correctly). (Note Password should be of minimum 8 characters). (Note Username cannot have space)
- Step 5) Create a Hotspot on your Mobile with name vmsrfid and password 12345678 Make sure there is proper mobile data connection on your mobile phone.
- Step 6) Restart VMS RFID Device, on restart it will connect to your Mobile Hotspot and download new Wifi Setting from cloud account. On Successful Download of Settings, it will give 3 Consecutive Beep Sound.
- Step 7) Restart VMS RFID Device, Ensure You Disable your Hotspot and New WIFI Router is On. After Restart RFID will connect to new Wifi. Check Blue Light status on VMS RFID Device.
VMS RFID Device is now ready to be used – You can check last update status on VMS Supervisor Account on Manage RFID Device Page.
FIRST USE
Before you first use the VMS System it is important to update various Master Tables. Also over the period as things change relevant master table should be updated.
Update Masters
Grades / Classes Master
Ensure all classes/grades that you require are added in your Class/Grade Master. Example: If you offer a special course like FINANCE then you should have got that added in Class/Grade master.
Division/Section Master
Like Classes Ensure you have sufficient Divisions added. Example if you have Special Names for Division like Alpha, Gamma, Beta then add them in Division Master.
Batch Timings
Ensure your Batches are Added Ex: Morning, Evening etc.
Academic Year
Add Necessary Academic Years Ex: 2019-20, 2018-19 etc. You can even have half yearly Academic years. Ex: 2018 H1 , 2018-19 H2 etc. Similarly you can add 3 Year Academic Years Ex 2018-2021 Batch
Subjects
Add All Subjects that you teach at your institution.
Grades Master
Update Your Exam Grades Setup. Ex: 90% - 100% = Grade A1 etc.
Number Bank
Update your Number Series for Automatic Generation of Payment Receipt
Map Class Subjects
Map Your Grades and Subjects Taught in Each Grade
Check Student Counts
Click on Summary Count Report in Student Management – In this report you can verify if all your students are added.
Fee Master
Open Fee Master for each Grade to verify if all the Fee Masters are created. If note Add respective fees for each grade.
Exam Master
Open Exam Master and ensure all the exams that you plan to conduct in near future are added.
DO’s and DONT’s
Daily Tasks (Class Teacher / Supervisors / Coordinators)
This are those task that ideally should be done on every working day of the Institution. This should ideally be done by respective class teacher and/or respective coordinators or supervisors.
Send Homework: Send respective home work to respective section. This should be done every day with utmost care and dedication. If on a particular day there is no homework, then send a note saying no homework for today.
Tip: Initially to get habituated, keep a register and sign daily to ensure you have send your homework. Also a Class book, divided into sections can be maintained each section further divided in each day of the week. Maintain homework given in this book, you can click a picture in VMS of this page and send to respective section. After sending sign the page to confirm that you have send this in VMS.
Send Child Related Alerts if any: During the class activity if you notice any activity performed by child especially if it is Positive Send a Positive note to parent about this activity, attach relevant picture if applicable. (Send only to that child). Also if you notice a child is not behaving correctly in spite of repeated attempts to resolve it an Alert to child’s parent can be sent.
Example Child helped some other child in completing his/her notes, Child spoke well in class, Child did some drawing on School Board, Child made some good drawing or project and you have installed that in school.
Send Class Pictures: For Grade Nursery to Grade 2 send frequently 2-3 Pictures every day and also cover each activity in detail for each child. For higher grades capture moments of all activities. Ex a moment in computer Lab or Science Lab practice or a PT Drill being performed or Field trip are even good moments to be covered.
Tip: Remember – Pictures Speak louder than words. This will create a great bond as parents can feel the experience of their child through this pictures. However do not over send picture of same group of child to entire section. Ensure you cover all children if not getting covered in single picture, click multiple pictures. Also if a child is not dressed correctly or seated correctly avoid send those picture.
Child / Child Related Picture: Picture of Birthday Event, Picture of any Project, Art or Painting made by the child in class, or a child planting a tree etc. Such moments can be capture and send to respective parent only. Do not send to entire section unless it is prize winning or award winning picture.
Syllabus / Projects / Work Sheets / Time Table
- Update monthly syllabus in beginning of the month. Upload PDF or Click picture of the syllabus.
- Update Exam syllabus prior to Exams.
- Send details of each projects to be completed by each grades.
- Work-Sheets can also have extra Question Test Papers or extra Tips for exam preparation.
Tip: Maintain an annual chart to track updates for each of the section
Daily/Monthly Tasks (For Supervisors – At School Level)
Alerts:
Pictures
Holiday
PTA Meeting
FEES / Accounts
Check if Fees are applied to all children by checking into various Fees & Management Reports
Exams Management
Important Care / Don’ts
While VMS is extremely easy to use, some care and precaution should be exercised.
Choose Grades/Section/Child properly:
Double check the recipient before sending the message. Do not click send to all if you want to send only to a particular child or a section.
Check Outbox – Do not Re-Send Message:
After you have sent messages, check outbox for green tick mark. If the tick is not green it means there is some Internet connectivity problem on your device. Do not Re-Send the message, make sure you have proper Internet, press the Sync button on top of Outbox and go to App Dashboard screen and click outbox again to check if the messages have gone.
English / Grammar
Message coming from an Institution is expected to be correct in its English and Grammar. Please do not use abbreviations or short forms unless necessary. Also double check yourenglish and grammar before you hit the send button.
Do not send Negative Remarks to parents frequently
Occasionally alerting parent about his child’s behaviour is ok and considered positive, but overdoing on that is not good.
Do not send Picture of Same group of child to parents of entire grade/section
Avoid sending pictures or achievements of same group of child to all parents in grade/section. This causes a complex situation and can do more harm then benefit